ユーザーズガイド ROLAND KD-7
Lastmanualsはユーザー主導型のハードウエア及びソフトウエアのマニュアル(ユーザーガイド・マニュアル・クイックスタート・技術情報など)を共有・保存・検索サービスを提供します。 製品を購入する前に必ずユーザーガイドを読みましょう!!!
もしこの書類があなたがお探しの取扱説明書・マニュアル・機能説明・回路図の場合は、今すぐダウンロード。Lastmanualsでは手軽に早くROLAND KD-7のユーザマニュアルを入手できます。 ROLAND KD-7のユーザーガイドがあなたのお役に立てばと思っています。
ROLAND KD-7のユーザーガイドをLastmanualsがお手伝いします。


マニュアル抽象的: マニュアル ROLAND KD-7
詳しい操作方法はユーザーガイドに記載されています。
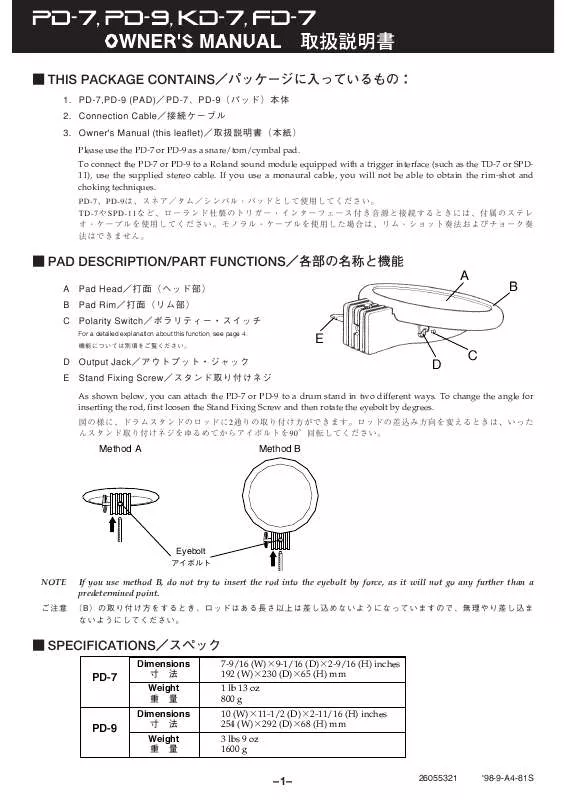
[. . . ] Please use the PD-7 or PD-9 as a snare/tom/cymbal pad. To connect the PD-7 or PD-9 to a Roland sound module equipped with a trigger interface (such as the TD-7 or SPD11), use the supplied stereo cable. If you use a monaural cable, you will not be able to obtain the rim-shot and choking techniques.
A
B
For a detailed explanation about this function, see page 4.
E D C
As shown below, you can attach the PD-7 or PD-9 to a drum stand in two different ways. [. . . ] At the appropriate time, these parts should be replaced. Component parts are available at the retailer from whom you have purchased your KD-7. For details, contact the authorized Roland distributor or local Service Station in your country.
The beater should be connected as shown in this figure.
Using your kick pedal, adjust the height of the foot plate so that the beater strikes the rubber pad squarely.
Kick Pedal
Anchor Bolt
Rotate the anchor bolt to join it to the foot plate and then adjust the height.
Foot Plate
Dimensions Weight
6-13/16 (W) 4-7/16 (D) 3-15/16 (H) inches 172 (W) 112 (D) 100 (H) mm 3 lbs 2 oz 1410 g (including the beater)
–2–
Connect the FD-7 to the Hi-Hat Control Jack on the TD-5, TD-7, TD-10 or SPD-11 using the supplied stereo cable. If you have connected the FD-7 to the Hi-hat Control Jack on the SPD-11, set the [HH CONT/EXT 4] select switch to the HH CONT position.
This adjusts the load (feel) of the pedal.
F
E
D
a b
You can adjust the travel of the pedal by changing the length of the Rod.
Connect this jack to the sound module.
A
Fasten this firmly when you use the FD-7.
B
C
You can adjust the travel of the pedal by changing the length of the Rod.
NOTE
When the FD-7 is not going to be used for a long period of time, set the Rod as shown fig b. Do not leave the FD-7 for a long time with the Pedal Plate depressed.
To use the FD-7 on a loop type carpet, attach the tapes as shown in the figure. Before attaching the tapes, be sure to remove any dirt or dust from the FD-7. Note that once the tape has been attached and then removed, it will be less adhesive.
Dimensions Weight
6-3/4 (W) 15-9/16 (D) 6-3/4 (H) inches 170 (W) 394 (D) 170 (H) mm 4 lbs 4 oz 1910 g
–3–
The PD-7, PD-9, and KD-7 are equipped with Polarity Switches which change the polarity of the trigger signal generated by hitting the PD-7/PD-9/KD-7. Set the Polarity Switch to the position required by the trigger interface you are using. If the polarity is not correct, the sound level may be reduced or the signal delayed. Set it to the “–” position when using a TD-5 , TD-10 or SPD-11. When using a TD-7, either position will do.
–
SW= +
Trigger signal
When the Polarity Switch is set to the “+” position, the trigger signal will begin on the positive side of the ground level.
Ground level
SW= –
When the Polarity Switch is set to the “–” position, the trigger signal will begin on the negative side of the ground level. –
Never use or store the unit in places that are: Subject to temperature extremes (e. g. , direct sunlight in an enclosed vehicle, near a heating duct, on top of heatgenerating equipment); or are Damp (e. g. , baths, washrooms, on wet floors); or are Humid; or are Dusty; or are Subject to high levels of vibration. To prevent accidents, never allow small children to play near the drum kit. When attaching the pads to the mounts, be sure to tighten the stand fixing screws securely. [. . . ] Although the PD-7, PD-9, KD-7 and FD-7 were carefully designed so as to reduce to the absolute minimum the unwanted sound that might be produced when played (impact and other operational sounds), even small amounts of such vibrational sounds can quite easily be transmitted through floors and walls. For this reason, we suggest that you exercise caution (especially in the late hours of the night) to avoid disturbing others within your residence or the immediate neighborhood.
Copyright 1997 ROLAND CORPORATION All rights reserved. No part of this publication may be reproducted in any form without the written permission of ROLAND CORPORATION.
–4– [. . . ]
ROLAND KD-7ダウンロード上のご注意
Lastmanualsはユーザー主導型のハードウエア及びソフトウエアのマニュアル(ユーザーガイド・マニュアル・クイックスタート・技術情報など)を共有・保存・検索サービスを提供します。
お探しの書類がなかったり、不完全だったり、言語が違ったり、モデル名や言語が説明と違う場合など、いかなる場合でもLastmanualsはその責を負いません。またLastmanualsは翻訳のサービスもしていません。
規約に同意して「マニュアルをダウンロード」をクリックすればROLAND KD-7のマニュアルのダウンロードが開始されます。
