ユーザーズガイド YAMAHA RS60 戵־
Lastmanualsはユーザー主導型のハードウエア及びソフトウエアのマニュアル(ユーザーガイド・マニュアル・クイックスタート・技術情報など)を共有・保存・検索サービスを提供します。 製品を購入する前に必ずユーザーガイドを読みましょう!!!
もしこの書類があなたがお探しの取扱説明書・マニュアル・機能説明・回路図の場合は、今すぐダウンロード。Lastmanualsでは手軽に早くYAMAHA RS60のユーザマニュアルを入手できます。 YAMAHA RS60のユーザーガイドがあなたのお役に立てばと思っています。
YAMAHA RS60のユーザーガイドをLastmanualsがお手伝いします。


この製品に関連したマニュアルもダウンロードできます。
 YAMAHA RS60 (466 ko)
マニュアル抽象的: マニュアル YAMAHA RS60戵־
詳しい操作方法はユーザーガイドに記載されています。
[. . . ] RS60
e q
e
q
w
e
r
w w w w r
t y
t
y
1
3
4
2
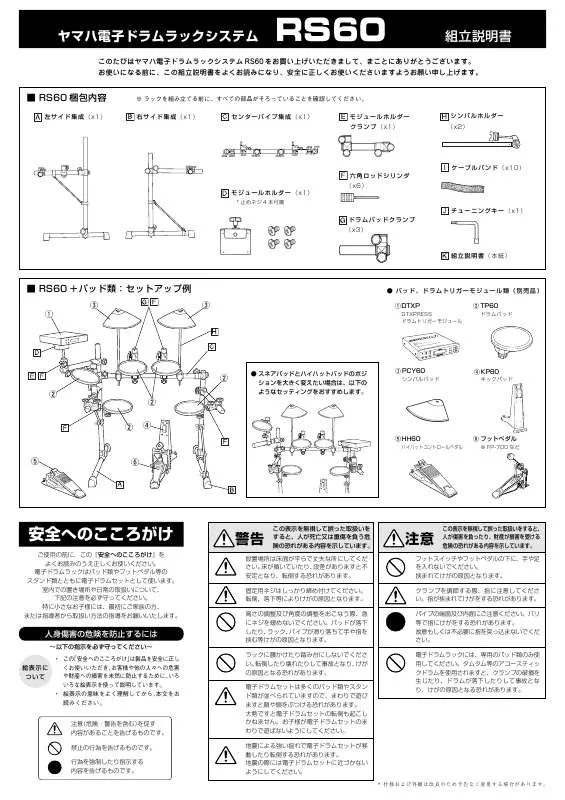
YAMAHA Electronic Drum Rack System
RS60
Center Pipe Assembly (x1)
Assembly Instructions
Thank you for purchasing the Yamaha Electronic Drum Rack System RS60. Before using, thoroughly read this assembly manual, and use this product safely and correctly.
I RS60 Rack Stand Parts
Left Side Assembly (x1)
* Before assembling the rack stand, make sure all of the parts shown below are included.
Right Side Assembly (x1)
Module Holder Clamp (x1)
Cymbal Holder (x2)
Cable Band (x10) Hex Rod Cylinder (x6) Module Holder (x1)
(4 screws included)
Tuning Key (x1) Drum Pad Clamp (x3) Assembly Instructions (this sheet)
I RS60 + Pad grouping : Set up example
e q e
G Pad and Drum Trigger Grouping (option)
q DTXP DTXPRESS Drum Trigger Module w TP60 Drum Pad
w w w w r
G For a move flexible snare/Hi-Hat setup, set the pads as shown in the illustration below.
e PCY60 Cymbal Pad
r KP60 Kick Pad
t HH60 Hi-hat Control Pedal
y Foot Pedal * FP-700 etc.
t
y
WARNING
Before using, please read this “Assembly Instruction” sheet, and use this product in a safe and proper manner. The Electronic Drum Rack System will be used in conjunction with the electronic drum set, pads, stands and foot pedals. [. . . ] They may become pinched resulting in injury. Be careful around pipe ends and inside the pipe. Metal shavings, etc. , may injure your fingers. Do not insert your fingers into the pipe on purpose or for any other reason. Only attach pads that have been designed for use on the rack. Attaching tom toms or other acoustic drums may damage the clamps; drums may drop, causing injury.
• Icons are used to indicate and explain the precautions. To promote the safe and proper use of this product, and to protect you and others from injury and loss of personal property. • Please read the precautions after you understand the meaning of the icons.
Do not sit or step on the rack. The rack may overturn or be damaged resulting in injury. The electronic drum set has many pads and stands so do not play or roughhouse around it. Many people roughhousing around the set may result in the set being overturned so children should refrain from playing around the set. Depending upon the strength of the earthquake, strong shocks may cause the set to overturn or move about. Stay clear of the set during earthquakes.
Caution (including danger, or warning). This mark indicates cautions in which you should pay close attention to. Acts indicated with this icon are prohibited and should not be attempted. This icon indicates acts that you are urged to follow.
* Specifications are subject to change without notice.
I RS60 Assembly
* A screw driver (+ or -) is necessary to complete the assembly. [. . . ] Attach the Module Holder (with the DTXPRESS attached) to the Module Holder Clamp .
Step 3-2
Step 3-1
Step 4-1
2-4
DTXP Module Holder Step 2-3 Step 2-4
Step 3-3
Hex Rod Cylinder Step 2-1
Tighten Step 2-2
Attach the Module Holder Clamp
After the above assembly is complete, set the Kick Pad, Hi-Hat Control Pedal, etc. into position and connect the necessary cables. To keep cable out of the way while playing, use the supplied Cable Bands to hold the cables to the rack systems’s pipes.
Left Side Assembly [. . . ]
YAMAHA RS60ダウンロード上のご注意
Lastmanualsはユーザー主導型のハードウエア及びソフトウエアのマニュアル(ユーザーガイド・マニュアル・クイックスタート・技術情報など)を共有・保存・検索サービスを提供します。
お探しの書類がなかったり、不完全だったり、言語が違ったり、モデル名や言語が説明と違う場合など、いかなる場合でもLastmanualsはその責を負いません。またLastmanualsは翻訳のサービスもしていません。
規約に同意して「マニュアルをダウンロード」をクリックすればYAMAHA RS60のマニュアルのダウンロードが開始されます。
